Practical OAuth Part One
OAuth (Open Authorization) is an open standard for access delegation, commonly used for internet users to grant websites or applications access to their information on other websites without giving them the passwords. It’s quite a mouthful, right? That’s the definition from Wikipedia for the specification behind the Login With Facebook, Login With Google, and Login with [Fill In Popular Site] buttons we see whenever we want to register or login into our various web accounts.
This post tries to explain the workings behind the spec. The post is for those that are interested in the implementation of the standard. If you just want to include the different login/register buttons on your site, I’d advise that you use the relevant libraries from the identity providers you wish to use.
This article will consist of two parts. The first part will introduce OAuth and a browser-based implementation, the second will discuss the terminal app-based implementation.
The source code included in this article has been tested on Django 4.0.4.
The way OAuth grants access is through tokens (access tokens). The tokens are used in subsequent interactions between the client app/website and the resource. There are four ways of authorizing an application. The four ways are:
-
Authorization Code: This is the most widely implemented type and is probably the OAuth you are familiar with. It involves four parties (user, browser, authorization server, and application). We will be discussing this implementation in this post.
-
Implicit Grant: This is a simpler version of the Authorization Code type. It is implemented by apps without the ability to store sensitive data on a server. More info on this implementation can be found here.
-
Password Credentials: Using this implementation, the user’s credentials are passed from the app to the authorization server to obtain an access token. This type is used when there is a high degree of trust between the user and the app. More info on this type can be found in the spec.
-
Client Credentials: Here, the client credentials are used as an authorization grant to obtain an access token. This OAuth type does not involve the user. More info on this type can be found here.
OAuth Parties/Roles
Before discussing the Authorization Code implementation of OAuth, we need to understand what the parties/roles are.
-
Resource Owner: The user/entity that owns the resources and is capable of granting access to it. For this article, ‘resource owner’ will be called ‘user’.
-
Client: The application that requires access to the resource. Once authorization is granted by the user, the application makes resource requests on behalf of the user.
-
Authorization Server: This server handles authentication and authorization on behalf of the resource server. It handles the authentication of the user via the authentication endpoint. Once that is successful, authentication of the client is done. If this is also successful, an access token is then issued to the client via the token endpoint.
-
Resource Server: The server protects the resource on behalf of the user. Once authorization has been granted by the authorization server, the resource server accepts and responds to protected resource requests by the client.
How It Works
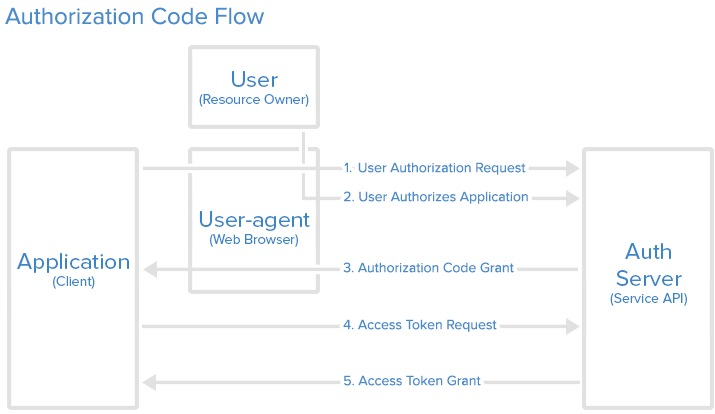
Illustration showing the OAuth 2.0 flow, from Digital Ocean
Client Registration
Before a client can be involved in the OAuth flow, it needs to be registered with the Authorization Server. This registration is done for security reasons to ensure the client is verified. The client name and website will be required information when registering. Some OAuth services will require the Redirect/Callback URL.
On successful registration of the client, the server will generate credentials for it. These credentials will be the client identifier and client secret. These credentials will be used for authenticating the client during the Client Authentication stage.
Note that this stage isn’t a part of the OAuth flow, so some services might not require client registration to use their OAuth service.
User Authorization
The client provides a link to the user with a URL whose structure looks like
https://authorization_server_domain/authorize_path?response_type=code&client_id=CLIENT_ID&scope=scopes&state=RANDOM_STRING&redirect_uri=https://client_domain/callback_path
- The
authorization_server_domainis the OAuth provider’s domain name e.ggithub.comis Github’s domain name. - The
authorize_pathis the path to the user’s authorization endpoint e.g/login/oauth/authorizeis Github’s user authorization endpoint’s path. - The
response_typeparameter is the OAuth authorization grant type. The value must be set tocode. The spec states that this is required but some OAuth providers don’t require it, especially if they only support this grant type. - The
client_idparameter is the client’s identifier. It is commonly generated when the client/app is registered with the OAuth provider. It is commonly required. - The
scopeparameter specifies the level of authorization that the client will have. It is commonly expressed as a list of space-delimited, case-sensitive strings.read:user repois an example of scopes as used in Github. It is recommended that the user authorization URL is encoded mainly due to the space delimitation of the scope parameter. - The
stateparameter is a random string generated by the client to maintain state between this step and the callback step. Its main role is to prevent cross-site forgery. The spec goes into detail concerning the reasoning behind this. It is a required parameter by many OAuth providers. - The
redirect_uriparameter is where the user’s browser/app is redirected to when the user has successfully authorized the client. Some providers require this on registration, which makes this an optional parameter in their authorization URL.
After the user clicks the link, an HTTP request is made to the authorization server. The server validates the client_id and the redirect_uri. If the validation succeeds, a form is displayed for the authenticated user to explicitly grant authorization to the client (unauthenticated users have to log in first). An error response is shown to the user if the validation fails.
Here’s a simple Django OAuth server with the following models
    class OAuth(models.Model):
        url = models.URLField(max_length=150, null=False, blank=False, unique=True)
        client_id = models.CharField(max_length=150, null=False, unique=True)
        client_secret = models.CharField(max_length=128, null=False)
        created_at = models.DateTimeField(auto_now_add=True)


    class Grant(models.Model):
        client = models.ForeignKey('server.OAuth', on_delete=models.CASCADE)
        user = models.ForeignKey(settings.AUTH_USER_MODEL, on_delete=models.CASCADE)
        code = models.CharField(max_length=150)
        expiry = models.DateTimeField()
        created_at = models.DateTimeField(auto_now_add=True)
The OAuth table stores the different client applications that will require authorization from this provider. The url column stores the application urls. The client_id column stores the applications’ client ids. The client_secret column stores the applications’ client secrets.
The Grant table is an append-only table that stores authorization requests from the different applications. This table is only written to when the user grants authorization to the app. The main purpose of this table is to store the generated code in the code column for validation. This validation will be done in the access token request stage. The client column stores the id of the application making the request. The user column stores the id of the user granting the authorization request. The code column stores the generated code for this particular request. The expiry column stores the code expiry time, this is for security reasons. The structure of this table implies that a user can grant authorization to several applications authorization and an application can request authorization from several users.
A simple implementation of the client_id and redirect_uri validation is shown below
    @login_required
    def authorize_request(request):
        client_id = request.GET.get('client_id')
        '''
            The scope value isn't used in this example because I didn't integrate permissions.
            Integrating permissions in the server is needed for scopes.
        '''
        _ = request.GET.get('scope')
        state = request.GET.get('state')
        redirect_uri = request.GET.get('redirect_uri')

        if not client_id or not state or not redirect_uri:
            raise Http404("Page does not exist")

        try:
            client = OAuth.objects.get(client_id=client_id, url=redirect_uri)
        except OAuth.DoesNotExist:
            raise Http404("Page does not exist")

        # Authorization code generation section. This part will be shown in the next stage
        .....

        form = AuthorizationForm()
        return render(request, 'user/authorize.html', context={'authorize_form': form, 'client': client.url})
The next stage is executed when the user grants authorization.
Authorization Server Sends Authorization Code
The server generates an authorization code and records it alongside the client in its database/cache. It is recommended that this code should have an expiry time to prevent reuse by the same parties in the future. This code and the state (originally sent by the client) are added as parameters to the redirect_uri provided by the client (either during the initial request or registration). This redirection URL will be similar to this structure {redirect_uri}?code={authorization_code}&state={state}.
Using the example URL shown above, here is an example URL
https://example.com/callback?code=RANDOM_STRING&state=RANDOM_STRING
The user’s browser/app is redirected to the above URL.
Here’s a simple implementation of this stage
    if request.method == "POST":
        form = AuthorizationForm(request.POST)
        if form.is_valid():
            expiry = timezone.now() + datetime.timedelta(seconds=settings.CODE_EXPIRY)
            code = generate_code()
            grant = Grant(user=request.user, client=client, code=code, expiry=expiry)
            grant.save()
            redirect_url = f"{redirect_uri}?code={code}&state={state}"
            return redirect(redirect_url)
        else:
            raise HttpResponseBadRequest(content="Bad content")
Client Requests Access Token
In the callback endpoint, the client validates the state parameter value. It requests an access token from the authorization server by sending its client credentials (client_id and client_secret) and the code parameter value. This request can be in any format supported by the server (JSON, x-www-form-urlencoded, …). This request is commonly a POST request.
Once this request is successful, the client can record this token in the user session.
Here’s a simple implementation of this validation and request process (Github OAuth)
    def callback(request):
        code = request.GET.get('code')
        state = request.GET.get('state')
        if state != request.session['state']:
            raise Http404('Wrong site')
        data = {
            'client_id': settings.CLIENT_ID,
            'client_secret': settings.CLIENT_SECRET,
            'code': code
        }
        headers = {
            'Accept': 'application/json'
        }
        response = requests.post('https://github.com/login/oauth/access_token', data=data, headers=headers)

        try:
            request.session['access_token'] = response.json()['access_token']
        except requests.JSONDecodeError:
            raise Http404('There was an error processing the response')
        except Exception:
            raise Http404('No access token was returned')

        ...
For the server, it validates the information sent by the client (client_id, client_secret, code). If this is successful, it generates a cryptographic token called the access token that might contain the user and scope information. This token is used by the client to access protected resources. It might also generate another token called the refresh token.
Here’s an example implementation of the server side of this stage which generates only access tokens and is unaware of scopes.
    @require_POST
    @csrf_exempt
    def access_token_request(request):
        client_id = request.POST.get('client_id')
        client_secret = request.POST.get('client_secret')
        code = request.POST.get('code')

        try:
            client = OAuth.objects.get(client_id=client_id)
        except OAuth.DoesNotExist:
            return JsonResponse({'message': "Client id or client secret is invalid"})

        if not check_password(client_secret, client.client_secret):
            return JsonResponse({'message': "Client id or client secret is invalid"})

        try:
            grant = Grant.objects.get(client=client, code=code)
        except Grant.DoesNotExist:
            return JsonResponse({'message': "The code is invalid"})

        if grant.expiry < timezone.now():
            return JsonResponse({'message': "The code has expired"})

        payload = {
            "exp": datetime.datetime.now(tz=datetime.timezone.utc) + datetime.timedelta(seconds=settings.ACCESS_TOKEN_EXPIRY),
            "user_id": grant.user.pk
        }
        access_token = jwt.encode(payload, settings.SECRET_KEY)
        return JsonResponse({"access_token": access_token})
The above implementation uses JWT to generate the token. Other kinds of tokens can be used in your implementation.
Using The Access Token
The client can now use the access token to carry out requests to the resource server as if it were the user. For example, it can use it to get the user’s profile information (this is what the sign-in buttons you see do), it could carry out actions on the resource server on behalf of the user e.t.c.
An example where we get the user’s GitHub profile info using the access token is shown here
    def answer(request):
        access_token = request.session['access_token']
        headers = {
            'Authorization': f"token {access_token}"
        }
        response = requests.get("https://api.github.com/user", headers=headers)

        try:
            json = response.json()
        except requests.JSONDecodeError:
            raise Http404("There was an error processing the response")

        context = {
            'username': json['login'],
            'id': json['id'],
            'url': json['html_url']
        }
        return render(request, 'client/answer.html', context)
Conclusion
OAuth is a fascinating topic and one of the most impressive pillars of our modern web. For an important part of the web, it is remarkably simple to understand.
In the above article and code, I left out PKCE short for Proof Key for Code Exchange. PKCE guarantees extra security against interception attacks on the authorization code. The spec on it is an easy read and covers it well.
My basic OAuth implementation (server & client) can be found on Github.
I will cover OAuth for a terminal-based app in Part Two.